Reconstituting PT-141 should be a controlled laboratory process, not a matter of adding an arbitrary amount of liquid and hoping the material dissolves.
The solvent, final concentration, handling method and storage conditions can all affect the consistency of the prepared research solution.
A small calculation error or an unsuitable diluent may change the concentration, cause precipitation or make results difficult to reproduce.
This guide explains how to reconstitute lyophilised PT-141 for non-human laboratory research only, with practical steps for concentration planning, sample handling, labelling, storage and troubleshooting.
Also check: BPC-157 Reconstitution: Step-by-Step Guide
What Does PT-141 Reconstitution Mean?
PT-141 is another name used for bremelanotide.
PubChem classifies bremelanotide as an oligopeptide and lists the free-base molecular formula as C₅₀H₆₈N₁₄O₁₀, with a molecular weight of approximately 1,025.2 g/mol.
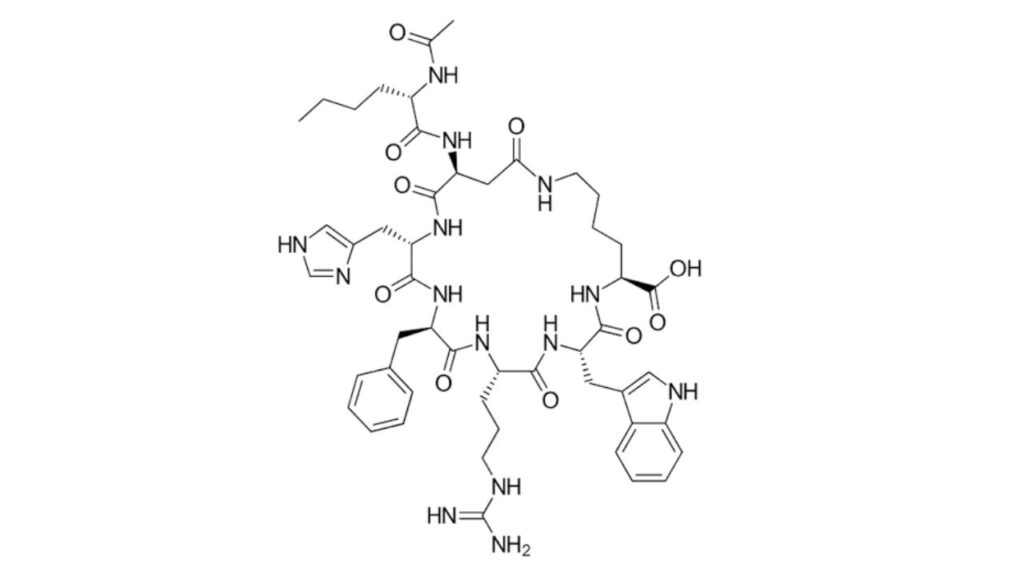
When PT-141 is supplied as a lyophilised material, most of the water has been removed during freeze-drying.
Reconstitution means adding a suitable laboratory solvent to produce a solution with a known concentration.
The important point is that reconstitution does not simply “activate” the peptide.
It creates a liquid research preparation that can be measured, divided into aliquots and handled according to a laboratory protocol.
Once the material is in solution, it is generally more exposed to factors such as:
- Temperature changes
- Light
- Oxygen
- Repeated freeze – thaw cycles
- Microbial or environmental contamination
- Unsuitable pH
- Incompatible solvents
For this reason, the reconstitution plan should be prepared before the vial is opened.
What You Need for PT-141 Reconstitution?
Prepare all materials before removing the vial from storage.
A typical laboratory setup may include:
- PT-141 research vial (get it from here)
- Certificate of Analysis and batch documentation
- Suitable laboratory-grade solvent
- Calibrated micropipette or suitable sterile transfer device
- Appropriate pipette tips
- Sterile or low-binding sample tubes
- Alcohol wipes or another approved surface disinfectant
- Laboratory gloves and other PPE specified by the Safety Data Sheet
- Permanent laboratory labels
- Batch record or electronic sample log
- Temperature-controlled storage
- Light-protective container where required
Use equipment that is appropriate for the volume being measured.
A device designed for large volumes may not measure a small volume accurately enough for concentration-controlled work.
How To Choose The Correct Solvent
The solvent should be selected from the Certificate of Analysis, supplier documentation or a validated laboratory protocol.
Thermo Fisher recommends sterile water or buffers such as PBS, Tris or phosphate buffer for the preparation of many peptide solutions.
However, it also notes that individual peptide properties depend on amino acid composition and recommends testing solubility with a small quantity where practical.
GenScript similarly advises that peptide solubilisation is material-specific. Poor solubilisation can result in inaccurate concentration calculations and experimental inconsistency.
Depending on the protocol, possible solvents may include:
- Sterile distilled or deionised water
- A specified phosphate buffer
- PBS at a defined pH
- Tris buffer
- Another validated aqueous buffer
- A small quantity of an approved co-solvent for difficult material
Is Bacteriostatic Water Required?
Not automatically.
A preserved diluent should not be selected simply because it is frequently mentioned in informal reconstitution guides.
Preservatives may interfere with analytical methods, reagents or other components of a research protocol.
Use bacteriostatic water (BAC water) only when:
- It is specifically compatible with the planned laboratory procedure
- Its preservative has been assessed for assay interference
- It is permitted by the batch documentation
- Its use has been documented in the laboratory protocol
For many controlled preparations, laboratory-grade sterile water or a defined buffer may be more appropriate. The correct choice depends on the material form and the downstream method.
What If PT-141 Does Not Dissolve in Water?
Do not immediately add a large quantity of another solvent.
Bachem recommends evaluating peptide polarity, sequence characteristics and terminal groups when selecting a solvent.
It notes that some hydrophobic peptides may require a small amount of an organic co-solvent before further dilution with water or buffer
The main risk is solving a visual dissolution problem while creating a new compatibility problem.
If a co-solvent is required, document both its final concentration and its suitability for the planned laboratory method.
PT-141 Concentration Calculation
The simplest concentration calculation is:
Concentration in mg/mL = peptide amount in mg ÷ solvent volume in mL
The same equation can be rearranged:
Required solvent volume in mL = peptide amount in mg ÷ target concentration in mg/mL
Example: 10 mg vial with 2 mL solvent
10 mg ÷ 2 mL = 5 mg/mL
You can also use our Peptide Calculator for more information.
Example concentration table:
| PT-141 in vial | Solvent added | Nominal concentration |
| 5 mg | 1 mL | 5 mg/mL |
| 5 mg | 2 mL | 2.5 mg/mL |
| 10 mg | 2 mL | 5 mg/mL |
| 10 mg | 4 mL | 2.5 mg/mL |
| 10 mg | 5 mL | 2 mg/mL |
These examples are concentration calculations for laboratory preparation. They are not a substitute for batch-specific instructions.
Calculating an aliquot volume
Once the stock concentration is known:
Aliquot volume = required research amount ÷ stock concentration
For example, a 5 mg/mL stock contains:
- 0.5 mg in 0.1 mL
- 0.25 mg in 0.05 mL
- 0.05 mg in 0.01 mL
Very small volumes may fall outside the reliable working range of the available pipette. In that situation, a lower-concentration working solution may provide more accurate liquid handling.
PT-141 Reconstitution: Step-by-Step Guide for Research
Step 1: Confirm the batch and required concentration
Match the vial to its Certificate of Analysis and record:
- Product name
- Batch number
- Documented amount
- Salt form, where stated
- Required stock concentration
- Intended solvent
- Calculated solvent volume
- Planned storage conditions
Have another trained laboratory worker verify the calculation when required by the laboratory’s quality system.
Step 2: Allow the sealed vial to reach room temperature
Remove the sealed PT-141 vial from cold storage and allow it to equilibrate to room temperature before opening.
Do not open a cold vial immediately. Moisture from the surrounding air may condense inside the container, particularly in a humid room.
It is recommended to allow lyophilised peptide containers to reach ambient temperature before opening. This helps limit moisture uptake by the dry material.
Where available, equilibration in a desiccator provides additional moisture control.
Step 3: Inspect the vial
Before adding solvent, check:
- Whether the vial is correctly labelled
- Whether the seal is intact
- Whether there is evidence of leakage
- Whether the container is cracked or damaged
- Whether the material differs noticeably from its documented appearance
- Whether the storage history is complete
Do not rely on appearance alone to confirm material integrity. A vial can appear unchanged even when it has been exposed to unsuitable storage conditions.
Quarantine the sample if the seal is damaged, the batch details do not match or the storage history cannot be confirmed.
Step 4: Prepare the work area
Use a clean laboratory workspace appropriate for the protocol.
Disinfect the work surface and prepare all equipment before opening the vial. Wear the PPE specified by the Safety Data Sheet and the laboratory’s handling procedure.
Where aseptic preparation is required, use suitable sterile consumables and minimise the time that the open vial and solvent are exposed to the surrounding environment.
Step 5: Measure the solvent accurately
Measure the calculated quantity of solvent using a calibrated pipette or other appropriate measuring device.
The concentration depends directly on the volume added. An error at this stage affects every aliquot prepared from the stock solution.
For example, adding 1.8 mL rather than 2.0 mL to a 10 mg vial would produce approximately 5.56 mg/mL rather than 5 mg/mL.
Step 6: Add the solvent slowly
Introduce the solvent slowly into the vial.
Where practical, direct the liquid towards the inside wall rather than applying a forceful stream directly onto the dry material. This allows the material to hydrate gradually and reduces unnecessary foaming or splashing.
Avoid vigorous shaking unless the product-specific instructions expressly require it.
Step 7: Allow the material to hydrate
Let the vial stand briefly after the solvent has been added.
Gently rotate, swirl or invert the vial to support dissolution. The method should be consistent across batches and documented in the protocol.
Some peptides dissolve quickly, while others require more time.
Peptide reconstitution can occasionally take several hours and controlled water-bath sonication may assist difficult dissolution, provided excessive warming is avoided. (Source)
Do not assume that stronger agitation is always the answer. Vigorous mixing may introduce bubbles, increase oxygen exposure or make visual assessment more difficult.
Step 8: Check the completed solution
Inspect the solution under suitable lighting.
Record whether it is:
- Clear
- Slightly opalescent
- Cloudy
- Discoloured
- Foaming
- Containing visible particles
- Showing material attached to the vial wall
- Forming sediment after standing
The expected appearance should come from the batch documentation or an approved internal reference.
Do not automatically treat a cloudy solution as acceptable simply because the original material is no longer visible.
Cloudiness may indicate incomplete dissolution, precipitation, particulate contamination or an unsuitable solvent condition.
Step 9: Divide the solution into working aliquots
When the full stock will not be used during one laboratory session, divide it into appropriately sized aliquots.
Each aliquot should contain enough material for one planned preparation or analysis period. This reduces the need to repeatedly thaw and refreeze the main stock.
Use tubes that are compatible with the solvent and suitable for low-volume peptide storage. For very small quantities, low-binding tubes may reduce losses to container surfaces.
Step 10: Label and document the preparation
Each stock vial and aliquot should be labelled with enough information to trace the preparation.
Include:
- PT-141
- Batch number
- Concentration
- Solvent or buffer
- Preparation date
- Aliquot volume
- Storage temperature
- Researcher initials or identifier
- Relevant protocol or project reference
The laboratory record should also include the calculation, equipment used, solvent batch, observations during dissolution and any deviations from the planned procedure.
Storage after reconstitution
The storage instructions on the Certificate of Analysis should take priority over general peptide guidance.
As a general principle, dry lyophilised peptides are usually more suitable for longer storage than peptide solutions.
Bachem advises storing lyophilised peptides in tightly closed containers below −15°C, with lower temperatures preferred for longer periods.
Troubleshooting PT-141 Reconstitution
1. Material is not dissolving
Possible causes include:
- Unsuitable solvent
- Stock concentration is too high
- Incorrect pH
- Insufficient hydration time
- Material has attached to the vial wall
- Temperature is too low
- Solvent composition does not match the batch form
- Precipitation occurred during dilution
Start by checking the Certificate of Analysis and calculation.
Allow additional time with gentle mixing. If a different solvent, altered pH, warming or sonication is being considered, use a validated protocol and test a small quantity first.
2. Solution becomes cloudy after dilution
A peptide may initially dissolve in a concentrated co-solvent but precipitate when water or buffer is added.
This does not mean the original dissolution was complete and stable. It may indicate that the final solvent composition cannot maintain the peptide at the selected concentration.
Check:
- Final pH
- Final co-solvent percentage
- Buffer composition
- Ionic strength
- Temperature
- Target concentration
- Order in which the liquids were combined
Do not continue adding co-solvent without considering its effect on the laboratory method.
3. Particles remain in the vial
Visible particles may represent undissolved material, precipitate or contamination.
Do not assume that filtering will correct the problem. Filtration can remove peptide aggregates along with unwanted particles, changing the actual concentration of the solution.
Document the observation and investigate the solvent, preparation method and storage history before using the material for research analysis.
4. Vial was opened while still cold
Opening a cold vial may allow condensation to enter the container.
Record the event as a handling deviation. Consider:
- How long the vial was open
- Room humidity
- Whether the remaining dry material was exposed
- Whether the complete vial was reconstituted immediately
- Whether analytical confirmation is required
Avoid repeatedly opening and closing a vial of dry material. Preparing appropriate aliquots can reduce future exposure.
5. Solution was accidentally shaken
Inspect the solution for persistent foam, cloudiness or visible particles.
Allow bubbles to settle without unnecessary additional agitation. Record the event and follow the laboratory’s deviation procedure.
Appearance alone cannot confirm whether the material is unchanged.
6. Sample has been through several freeze–thaw cycles
Repeated temperature cycling may reduce sample consistency even when no visible change is present.
Record the number and duration of the cycles. Depending on the research protocol, the sample may need to be quarantined or checked using an appropriate analytical technique.
The best prevention is to prepare smaller aliquots during the initial reconstitution.
Note: This article is for educational and research information only. Products discussed are intended for laboratory research use only and are not for clinical, food, cosmetic, veterinary, or household applications.